Wed, Jun 28, 2017Companion code for this post available on Github
Some time ago now, I built my first moderately complex electronics project, an
ethernet connected Nixie clock that pulled the time over
NTP
(all the code and
schematics for which are on Github
for those interested). Sadly, the one that had been running continuously since
then croaked in a non-obvious enough way that I couldn’t repair it. Rather than
re-fabricate the old design, I took this as an opportunity to revise the design
and make some modifications.
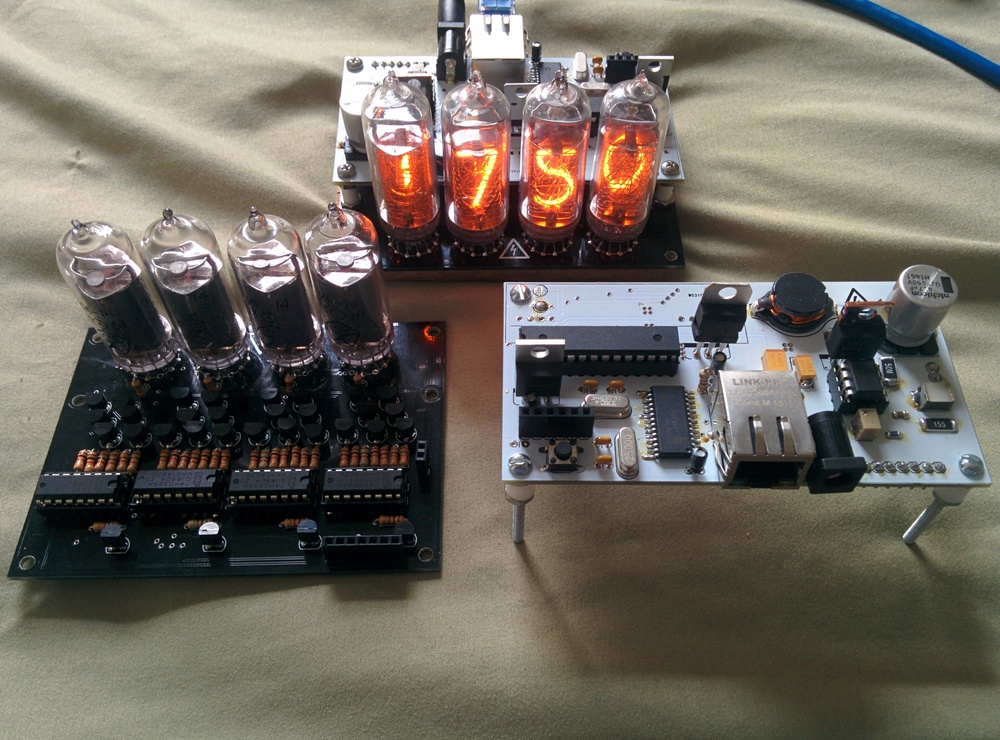
The original two-part design, witn IN-16 tubes
While the previous version did have NTP, it was over ethernet (the
ENC28J60 is
considerably cheaper than any wifi chipset, especially at the time) which
limited the locations that the clock could be plugged in. Version one was also
a four digit display, which was nice and compact but doesn’t have the
engagement of a noticeably ticking seconds place. Since adding a seconds place
would make the design quite wide, I opted for more of a desk-placard form
factor than the relatively cubelike design of v1. For style, the front would be
just the display. Since the IN-16 tubes used for the first version are
uprights, for this design I switched over to IN-12 tubes, which have their
display in the same plane as the PCB they are mounted to.
So the first step was to make the smallest possible board that can hold the
display tubes themselves, and use this as a reference for all the other boards:
This gives us a roughly 6.25” x 2” area to be getting on with, so next is to
make sure that the brains of the operation can all fit into that space.
The main things we need to cram in are:
The MCU: This will need to wrangle the WiFi chipset to fetch NTP offsets from
the net, as well as marshal that data in such a way as to drive the display
logic. Since there’s not too much processing going on here, we don’t need a
hugely beefy chip. Here I’ll be using the
Atmel ATMEGA238P,
since it’s more
than capable for the task and allows me to take advantage of the Arduino
software ecosystem. This MCU doesn’t require much by way of supporting
components - just a crystal.
Wifi: I know that the
ESP8266
is the darling these days, but I could never
get one to program correctly and have a (perhaps irrational) preference for SPI
over UART. To that end, my go-to wifi chip is the
Atmel ATWINC1500, which is
somewhat more expensive but has proved easier to work with. It does run at 3.3V
though, unlike the ATMEGA which will be running off 5V.
Boost Converter: In order to drive the Nixie tubes, we’ll need around a
170V potential on the anode. For step-up designs like this I usually use the
MAX1771
controller, which tends to work well for high voltage boost circuits. I
ran intp an issue with the previous design where there was a barely audible
ringing, which I think was due to small traces on the boost circuit. This time
I resolved to use much larger fills for the high current path on the boost
circuit to try and eliminate that issue.
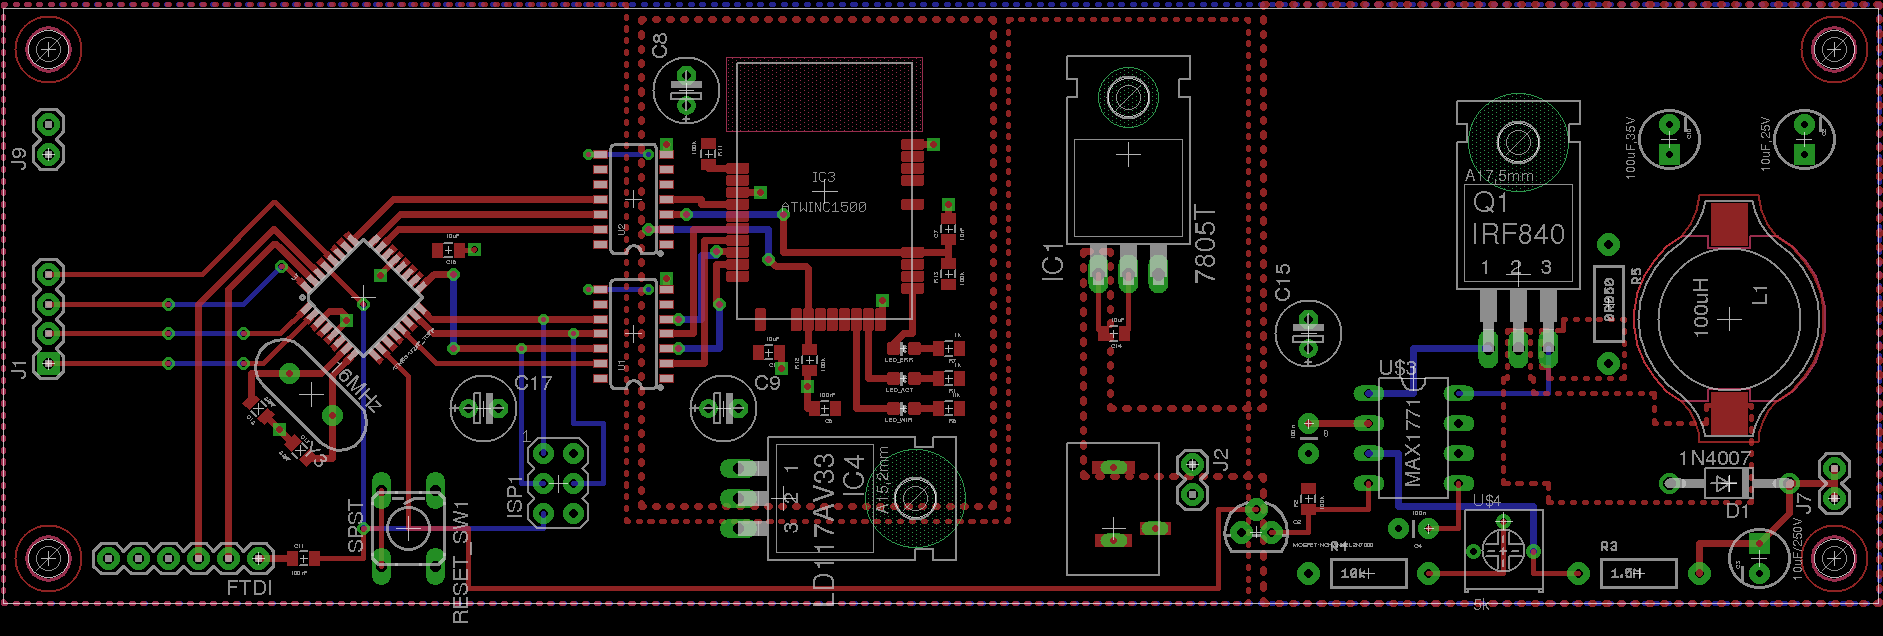
At the end of the day, the control board is split into three broad nets - the
12V input from the barrel jack on the back feeds the boost circuit on the right
of the PCB, as well as feeding the 5V logic through an ordinary linear
regulator. Since the current draw on the MCU isn’t significant, the regulator
doesn’t seem to get too hot. The 5V logic is then linked to the WiFi module
through some level shifters, and the power is fed through a second regulator.
Final layout of the control board, with room to spare
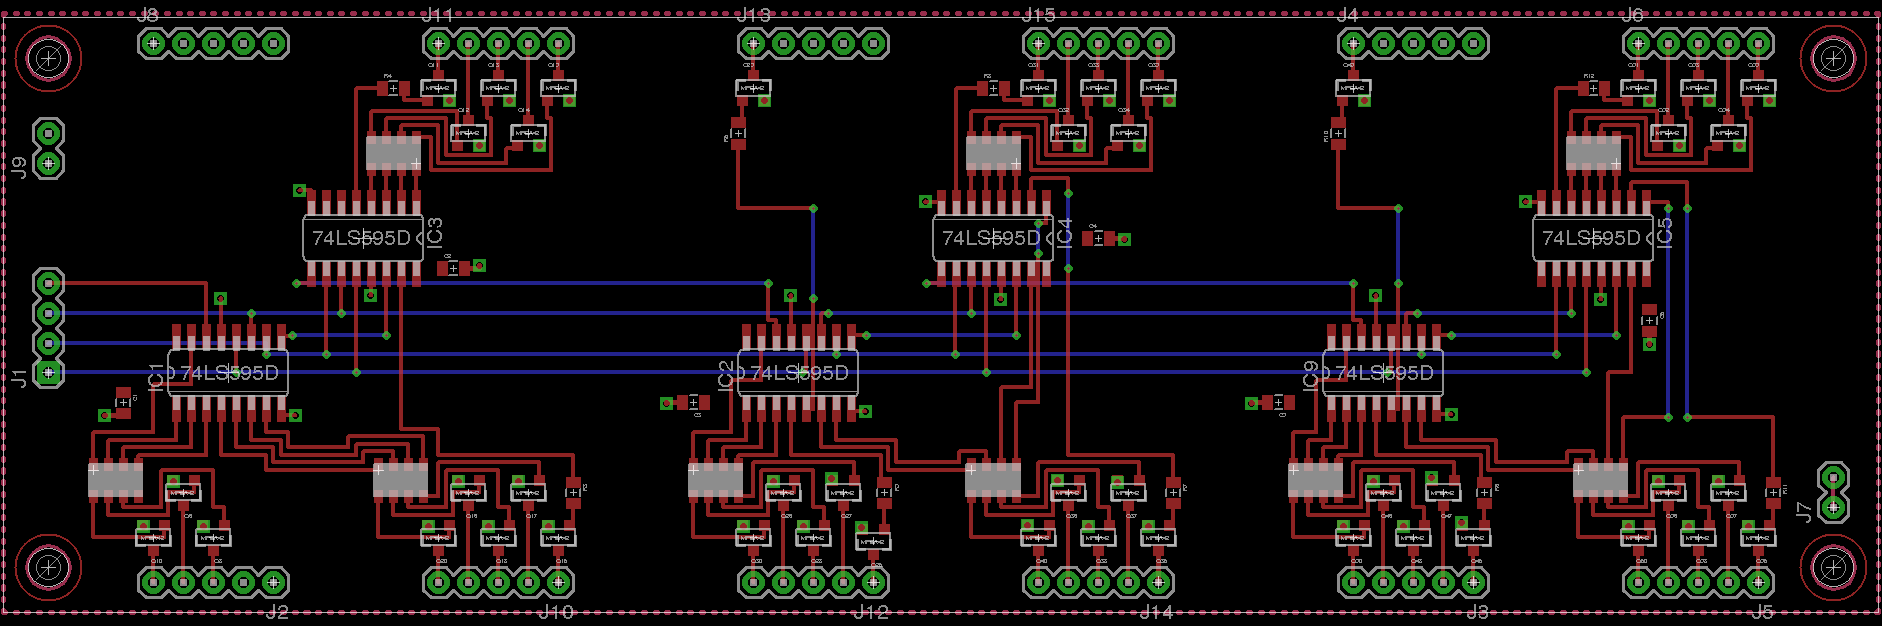
The middle board is fairly boring - in order to drive the nixies, the active
number needs the cathode pulled low to allow current to flow. In order to
handle any possible high potential on the cathode lines, each one is connected
to ground through a high voltage
MPSA42
transistor, with a collector-emitter
voltage of 300V (more than enough for the 170V that it could be required to
handle in this circuit). Since the MCU can’t drive all 45 cathode pins itself,
I’ll be using ordinary
LS595
shift registers to translate serial data from the
MCU into parallel output to all the cathode driving transistors. If we wanted
a design that could possibly be used for other numeric display functions we’d
wire up all of the digits on the nixie tubes, but since that would add
significantly more connections (and so more 595 chips (and so more complexity))
I’ve opted not to here.
The shift register mux board
Now that all of the hardware is together, the only thing left is to program the
thing. The full code is available
here,
if you want to have a read through the entire thing, but the gist is thus:
On boot, and every hour thereafter, ask the NTP server for the current time
Transform the time to local time, and store the difference between the
current local time and the current internal monotonic clock.
Every 50 milliseconds, calculate the current local time based on the
millisecond offset from the NTP server and convert it into a series of bytes to
be written to the shift register
The most interesting part to write was the NTP code - I’ve never gone in depth
on the NTP spec before, and like many RFCs it’s an interesting read. Version 4,
which we’ll use here, is defined in
RFC #5905. Under section 7.3, in figure
8, we can see a nice diagram of the packet header format. This is all we need
to be able to get the time from the net, as demonstrated here:
/**
* Issue an NTP sync request to our timeserver.
* This involves building up a packet by hand - reference to RFC5905 is key
* https://tools.ietf.org/html/rfc5905#section-7.3
*/unsignedlongsendNTPpacket(IPAddress& address) {
// Zero out our packet buffer
memset(packetBuffer, 0, NTP_PACKET_SIZE);
// Our first byte contains the Leap Indicator, Version Number and Mode.
packetBuffer[0] = (
// Leap indicator is set to 3 (clock not sync'd)
0x03<<6|// Version number is 4, the current version of NTP
0x04<<3|// Our mode is 3, client
0x03<<0
);
// Next is stratum, in this case unspecified
packetBuffer[1] =0x00;
// Polling interval - the maximum interval between successive messages.
// This is a funky variable; it's in log2 seconds.
// 6 is the recommended lower bound, so we'll use that
packetBuffer[2] =0x06;
// The precision of our own clock.
// This is also in log2 seconds (signed). So to specify microseconds, that's
// 1 / 1,000,000 seconds. log_2(1000000) is 20 (well, 19,9), so for one
// onemillionth of a second we want -20.
packetBuffer[3] =0xEC;
// 8 bytes intentionally left blank for the root delay and root dispersion.
// These count time lags for the reference clock, and we don't really care.
// Next 32 bits are the Reference ID. I can't quite determine what exactly
// the spec wants here, but 'INIT' is a valid kiss code for not having
// synchronized yet so we'll go with that
packetBuffer[12] ='I';
packetBuffer[13] ='N';
packetBuffer[14] ='I';
packetBuffer[15] ='T';
// There are more fields in an NTP packet, but we don't care about them here
// Now that the packet is all set, we can send it off to the timeserver
// NTP runs on port 123
Udp.beginPacket(address, 123);
Udp.write(packetBuffer, NTP_PACKET_SIZE);
Udp.endPacket();
}
Once we’ve sent off that request, we hope that we’ll get a response back, and
can deal with it pretty easily:
/**
* Parse the response datagram from the NTP timeserver
*/voidparseNtpResponse() {
// Read the response packet into the buffer
Udp.read(packetBuffer, NTP_PACKET_SIZE);
// The info we care about, the NTP timestamp, begins at byte 40 in the
// packet and is 4 bytes long. Grab those bytes and convert them to an
// unsigned long.
unsignedlong highWord = word(packetBuffer[40], packetBuffer[41]);
unsignedlong lowWord = word(packetBuffer[42], packetBuffer[43]);
// NTP counts seconds since 1900, not seconds since 1970.
unsignedlong secsSince1900 = highWord <<16| lowWord;
// So to convert to UNIX epoch, just need to subtract 70 years in seconds
constunsignedlong seventyYears =2208988800UL;
unsignedlong epoch = secsSince1900 - seventyYears;
// Now, convert that epoch to our local timezone
unsignedlong localTime = usEastern.toLocal(epoch);
// And update our millisecond offset
updateOffset(localTime);
}
Finally, we have our update code. It’s pretty basic - switching on each of
the digits allows us to easily control each bit output, but seems verbose. It
may be possible to get a better density using some refined bit twiddling, but
the explicit form is easy to modify, and handles the fact that our outputs are
somewhat willy-nilly.
/**
* Takes the hours, minutes and seconds and maps them into bits on the shift
* registers. Elegant? Perhaps not. Functional? Yes.
*/voidwrite595Time(uint8_t hours, uint8_t minutes, uint8_t seconds) {
// Create an output buffer
uint8_t out[] = { 0, 0, 0, 0, 0, 0 };
// Low 3 bites on the first shift register control the hours tens
switch (hours /10) {
case0: out[0] |= (1<<0); break;
case1: out[0] |= (1<<1); break;
case2: out[0] |= (1<<2); break;
}
// The upper bits of the first, and lower of the second, registers control
// hours ones
switch (hours %10) {
[...]
}
[...]
// Now shift out the data to the registers
digitalWrite(N_RCK, LOW);
for (int i =5; i >=0; i--) {
shiftOut(N_SER, N_SCK, MSBFIRST, out[i]);
}
digitalWrite(N_RCK, HIGH);
}
The easily editable switch tables allowed for some last minute tweaking of
values, after I realized that some of my between-board tracings had been
pin-shifted slightly
Testing the output mapping
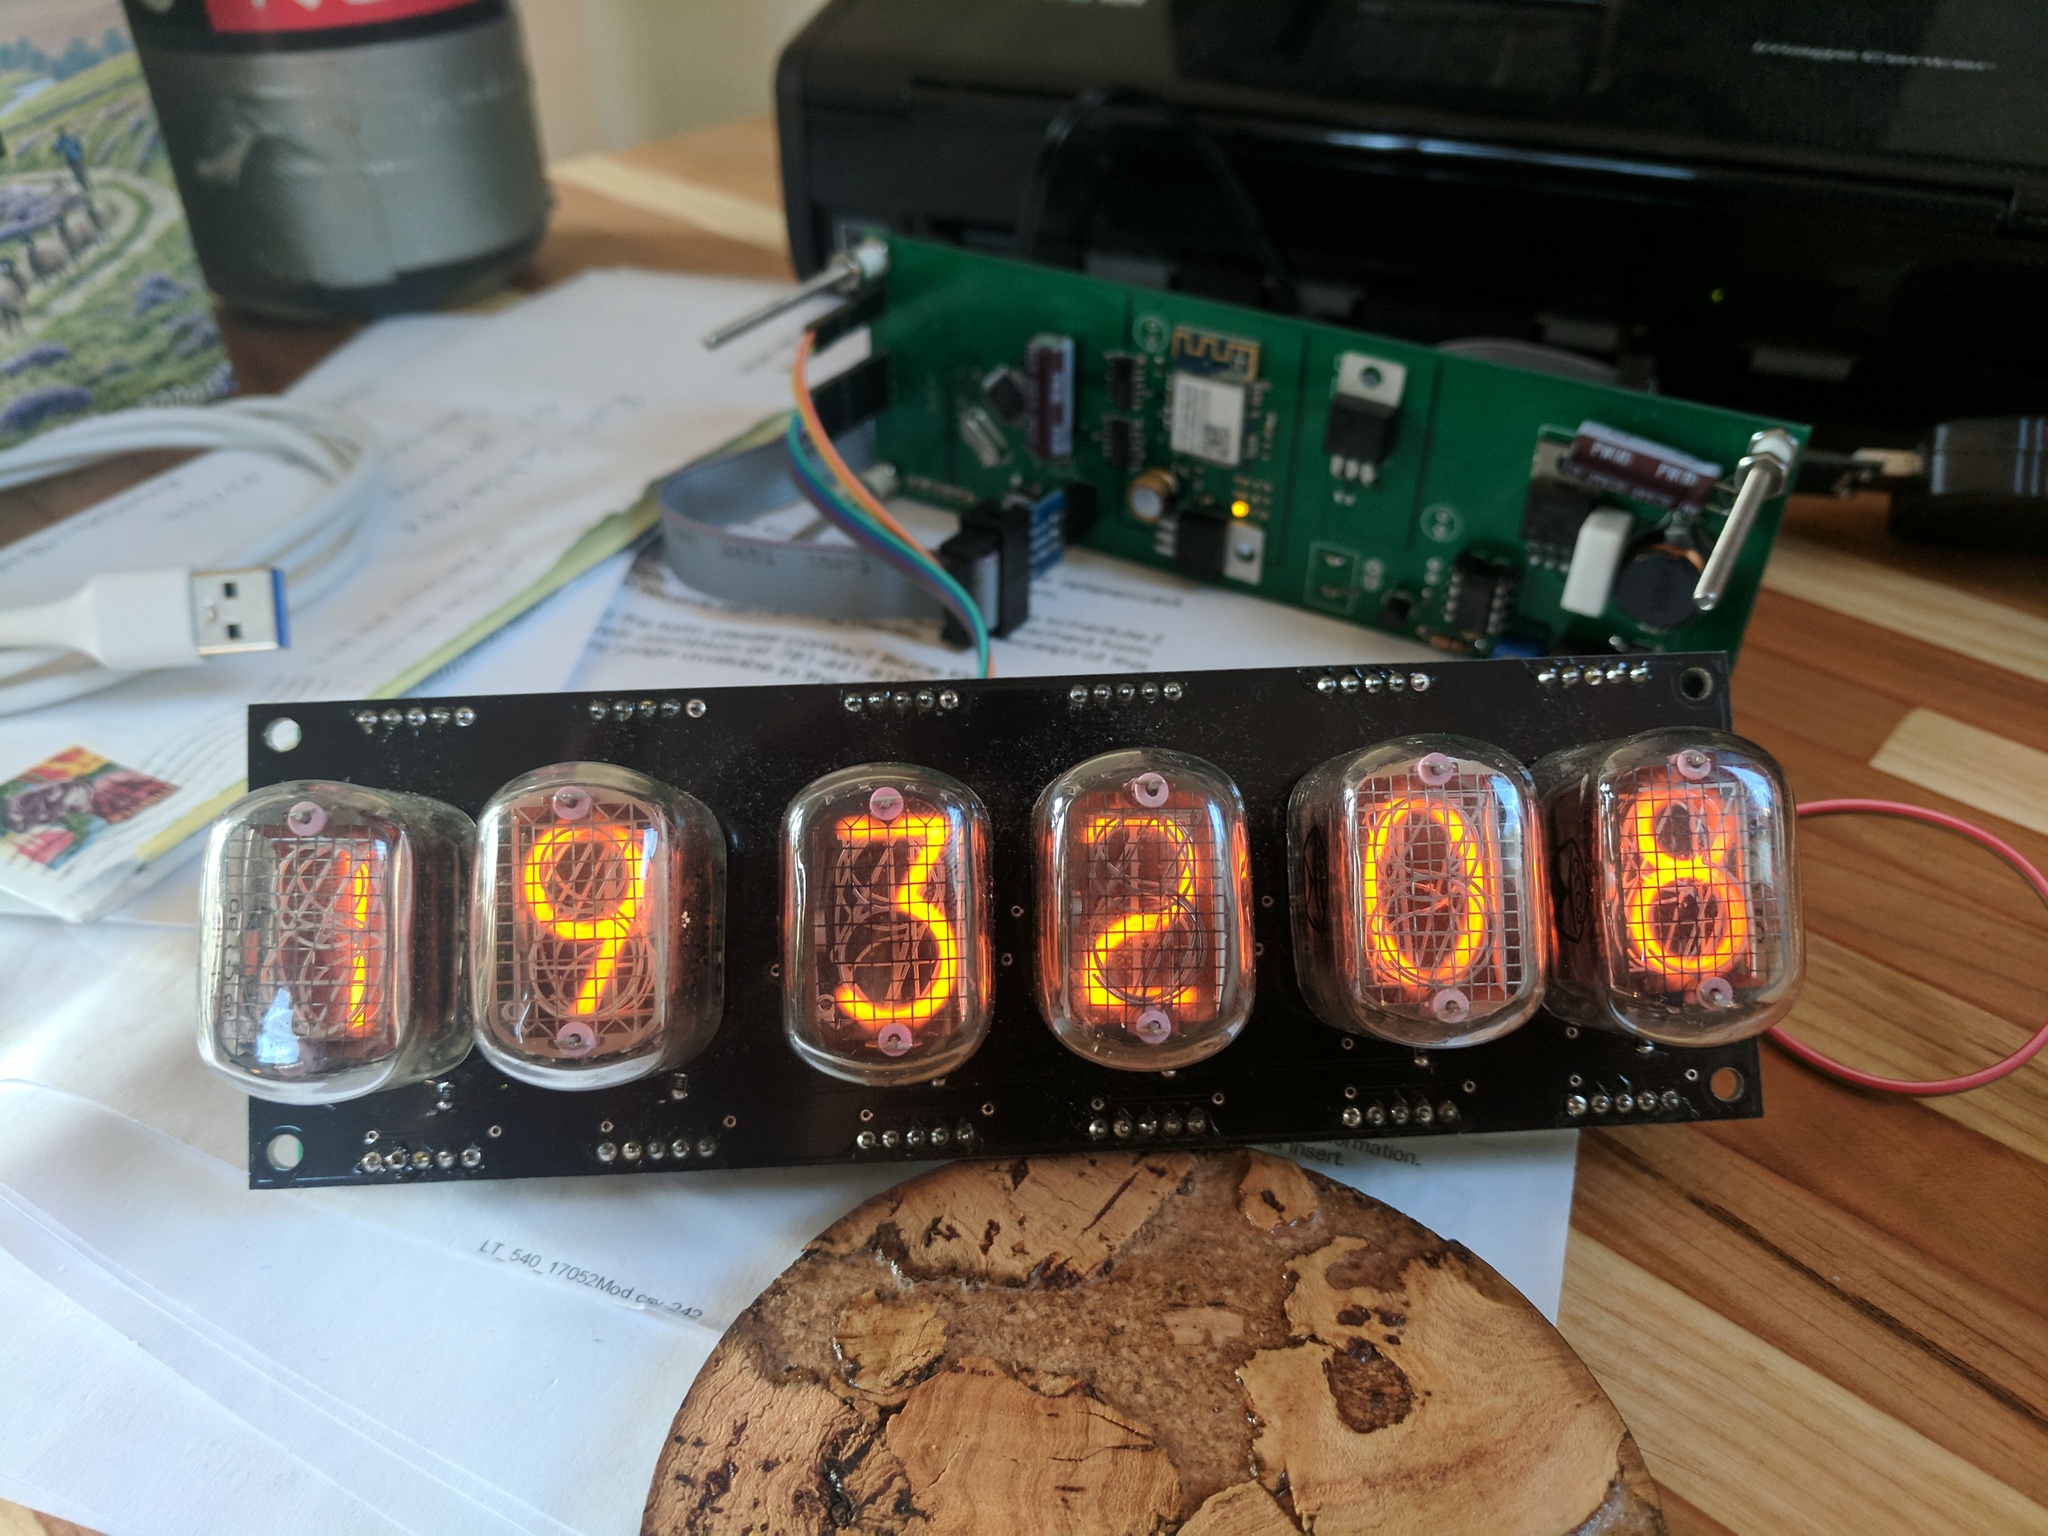
With the code loaded, I once again have a functioning timepiece on my desk. At
some point I’ll fabricate some sort of housing, but until then the bare board
aesthetic will have to do.
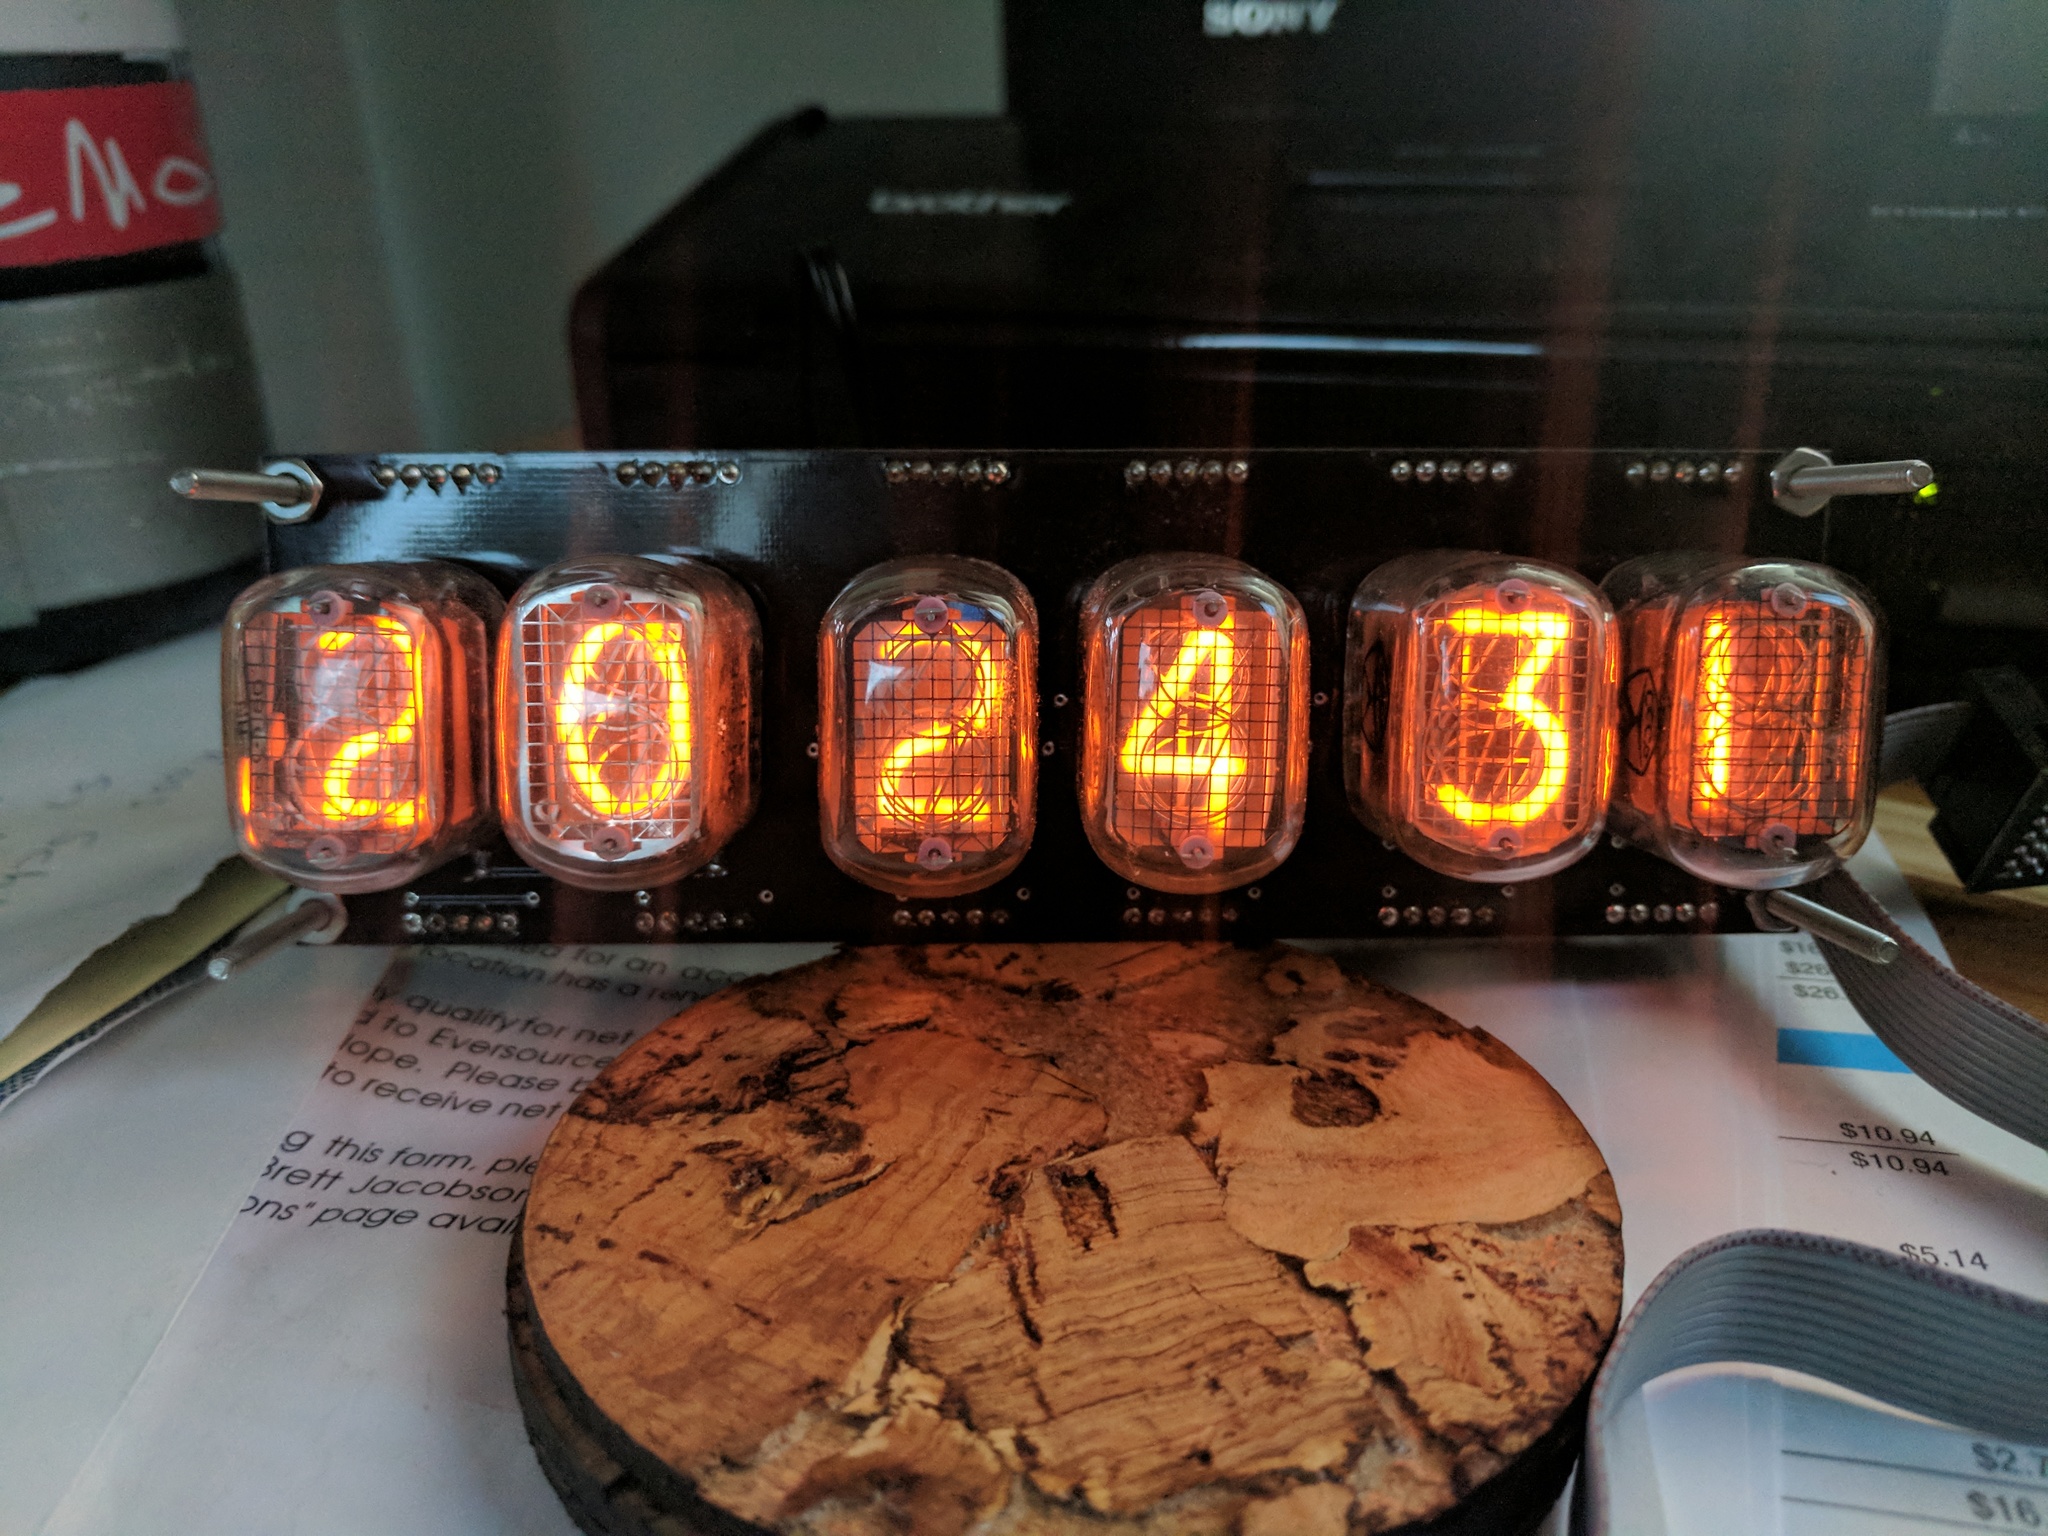
The assembled version two
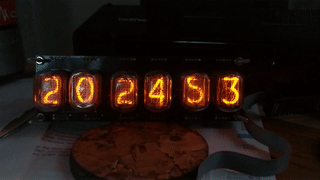
Bonus GIF
All of the EAGLE design files for the clock, as well as the code for the
atmega, are available in
this Github repo.
Mon, Mar 27, 2017Companion code for this post available on Github
As part of a push to make keeping track of my finances easier without
surrendering banking credentials to popular money-management tools, I have been
working on a project that allows me to track my incomes and expenditures in a
database, with a simple companion app for adding transactions and running
visualizations of the data. But one of the major hurdles to keeping track of my
spending is the fact that I had to manually enter each and every transaction,
not just categorize it. To solve this problem, we can tap into the data used
by apps like Quicken to manage your banking information - OFX. Here, we’ll go
over what OFX is, how to get data from your bank in an OFX format and how to lex
and parse that data to make it useful.
If you want to skip ahead, the full library is on Github.
History of OFX
OFX is a product of collaboration between Microsoft and Intuit (of Quicken) in
the late 90s. The initial versions were built on top of
SGML,
which is a
precursor of XML. As used in OFX, there are no closing tags for leaf values in
SGML - a fact that makes modern XML parsers unsuitable for translating it into
a document that we can then work with in code. Banks that offer an ‘Online
banking with Quicken’ feature will usually do so through an endpoint that
speaks OFX, and access to this API is usually accessible for $10 per month or
so, depending on the bank.
Fetching OFX from an institution
As a prerequisite for parsing OFX data, we need to acquire some. OFX data
transfer takes place over a single API endpoint, by sending an OFX document
with one or more stanzas in it and receiving another document with a response
For an example OFX request, here’s a request to fetch account information from
my Chase account (certain information redacted, of course):
As you can see, there are two stanzas in this request - the first, the
SIGNONMSGSRQV1, is common to all requests you will make to the server. It
identifies who you are (USERID, USERPASS), which bank you want to talk to;
Chase in this case, represented by it’s ORG and FID identifiers. Values
for your bank can be found online, GNUCash has a good list
here.
This section also identifies the application we are using to talk to the bank.
In this case I am ‘Quicken’ version 2200. Some banks will refuse to talk to you
unless you tell them that yes, you are definitely Quicken.
The second stanza is our actual request for information - we are making an
account information transaction request (ACCTINFOTRNRQ), with a unique
transaction UUID, with an account information section stating that we last
checked for account info the day before the UNIX epoch, and so should be
assumed to know nothing.
To send this request to our bank, we will attach our generic
OFX header
and then send our request off, being sure to state the content type and
Connection: close, which seems to be necessary for some banks.
Excellent. Now let’s define a representation for this data that we can work
with more easily in Erlang. There are two distinct node types - they may either
have a value, and no close tag, or some children and a close tag. Let’s
represent them as two different records, as such:
-record(ofx_node, {
          name :: nonempty_string(),
          children :: [#ofx_leaf{}]
         }).
-record(ofx_leaf, {
          name :: nonempty_string(),
          value :: nonempty_string()
         }).
Enter Leex
Leex
is a
lexer, a tool for taking our
blob of OFX text and turning it into a list of meaningful tokens. In order to
do so, we need to specify a couple of rules first. Leex input files have three
sections: Definitions, Rules and Erlang code.
The definitions section is a context-free
grammar for defining
patterns that can then be used for building up rules. For example, U can be
defined as [A-Z], or a shorthand for all uppercase letters. L can then be all
lowercase ([a-z]) and the two can then be combined to refer to all letters as
ALPHA = ({U}|{L}).
Once we have a set of definitions for character groups, we can then write the
rules section. This is where the requisites for tokenisation are defined - for
example, we want to emit a token every time we see an opening tag, and want to
include in that token the name of the tag. On the left hand side of the tag, we
write the match expression - in this case, <({TAGCHAR})+>, for one or more
characters in the set of allowable tag names bounded by angle brackets.
On the right hand side, we then specify what the lexer should do when it
encounters something that matches this pattern. In this case we want to emit a
token, so we’ll write {token, {opentag, lists:sublist(TokenChars, 2, TokenLen-2)}}.
This means it will emit a token that is a 2-tuple of the atom opentag and a
substring of the matched string that removes the enclosing ‘<>‘. So, for
example, if the lexer encountered the tag <OFX> it would then emit the token
{opentag, "OFX"}.
The final section allows for the definition of generic Erlang methods that can
then be used in the right hand side of rules. For example, we could take our
substringing code from the match rule we just defined and place it in a
convenience method in the code section.
Once we are finished writing our rules, we end up with a leex file that looks
like this:
We emit three kinds of tokens - opentag, when a tag is opened, closetag,
when a tag is closed and string when we encounter a string literal (tag
value). With just these three types, we can then build a parser that can turn
this list of tokens into a document tree.
Parsing the tokens
As stated when we built our records, we only have two cases we need to deal
with here - leaf nodes, which will always be [{opentag, Tag}, [{string, Value}]
and parent nodes, which will be
[{opentag, Tag}, ...tag_children..., [{closetag, Tag}].
This means that leaf nodes can be parsed easily by matching on the head of the
tag list, and our more complex case of a parent node can be handled by a
secondary method that accumulates all nodes until it encounters a specified
terminal node. The implementation is as follows:
% Parses a list of tags into an OFX data tree.
% Will error out in there are tokens that cannot be parsed as part of the tree.
parse(Tags) ->
{Tree, Unparsed} =parse_node(Tags),
[] =Unparsed,
Tree.
% Parse a single OFX node from tokens.
% Returns the node, and any unused tokens.
parse_node([{opentag, Tag}|[{string, Value}|Tags]]) ->
{#ofx_leaf{name=Tag, value=Value}, Tags};
parse_node([{opentag, Tag}|Tags]) ->
{Children, Tags2} =parse_node_list(Tag, Tags),
{#ofx_node{name=Tag,children=Children}, Tags2}.
% Convenience method for parse_node_list/3.
parse_node_list(EndTag, Tags) ->
parse_node_list(EndTag, Tags, []).
% Parses a list of child nodes. Stops parsing when a {closetag, } tuple is found
% with a name matching the EndTag.
parse_node_list(_EndTag, [], Nodes) ->
Nodes;
parse_node_list(EndTag, [Tag|Tags], Nodes) ->
{Node, Tags2} =parse_node([Tag|Tags]),
casehd(Tags2) of
{closetag, EndTag} ->
{[Node|Nodes], tl(Tags2)};
_ ->
parse_node_list(EndTag, Tags2, [Node|Nodes])
end.
This isn’t robust against malformed SGML, and will need as many stack frames as
the tree is deep, but it gets the job done. If we now take the our list of
lexed tags from the previous step, we can run them through the parser and we
should get a workable tree of records like so:
Fri, Mar 10, 2017Companion code for this post available on Github
Modern compilers can detect all sorts of things, from
the humble type error to mismatched format strings, but in some cases it’s just
not feasible or the the use case is not widespread enough for an error pattern
to be detected at compile time. Luckily, in the Java/Android ecosystem, there
are two tools that exist to take compile(ish)-time checking to the next level -
Android Lint,
a tool supplied as part of the Android SDK for catching Android-specific errors
(resource size inconsistencies, missing translatins, etc) and the
FindBugs Project,
a well established project from the university of Maryland, and what we will be
digging into here. We’ll take a quick look at what it is, go over a small
refresher on Java’s try-with-resources pattern and then dive into writing our
own detector that will ensure all Cursor operations are wrapped in one of
these try-with-resources blocks.
Some background
Findbugs is a
static analysis
tool that operates on compiled java bytecode to detect code that is
deemed acceptable by the compiler, but not necessarily what the programmer
mind. Examples would be detecting a null return from a method that should
return Boolean, inconsistent synchronization of variables and unnecessary math
operations.
At it’s core, FindBugs is powered by the
Apache BCEL,
a library for the inspection and manipulation of compiled Java bytecode. On top
of this, FindBugs adds some extra parsing for easy access of operands, a visitor
pattern for iterating over bytecode, and a mechanism for accumulating and
displaying bugs. If you don’t already use FindBugs as a part of your android
testing and deployment pipeline, even just the core detectors are well worth
adding to a project. An example of how to add FindBugs as a task to an existing
Android project (with gradle) can be seen
here.
Customization
But what happens if you have a code case that is too specific to your
application (e.g. invoves Android classes) or to your internal practises
(style guides, design patterns, etc)? Luckily, findbugs makes it fairly simple
to add additional detectors, and it’s even possible to include a set of custom
detectors as part of an existing android project to be run alongside the built
in detectors whenever the project is tested by hand or CI server.
A complete, buildable Android project with the detectors built in this post is
online
here if you wish to
use it as an implementation reference or just follow along.
The use case
In Java 7, the try-with-resources pattern was added. This allowed for the
declaration of resources as part of the try() header that would
be automatically closed when the block exited, either normally or with an
exception. This is very convenient when dealing with files, sockets, database
cursors or other objects that must be closed when you are finished with them.
Naturally, you’ll want to implement this everywhere you use Cursors in
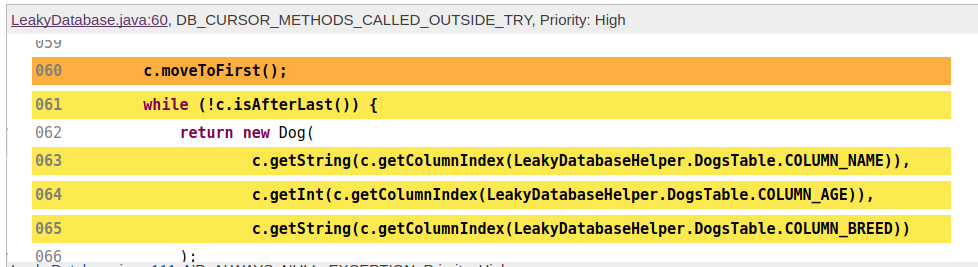
Android, because it’s a nice simple way to avoid leaking them:
try(Cursor c = db.query(...)){
c.moveToFirst();while(!c.isAfterLast()){returnnew Foo(
c.getString(c.getColumnIndex(...))...);}}
Alas, if you really want to target as many Android users as possible, you
inevitably have to make sacrifices for compatibility. One of them is that
try-with-resources requires API 19, which cuts off the small but not
wholly insignificant ~10% (at time of writing) of users on API 18 and older.
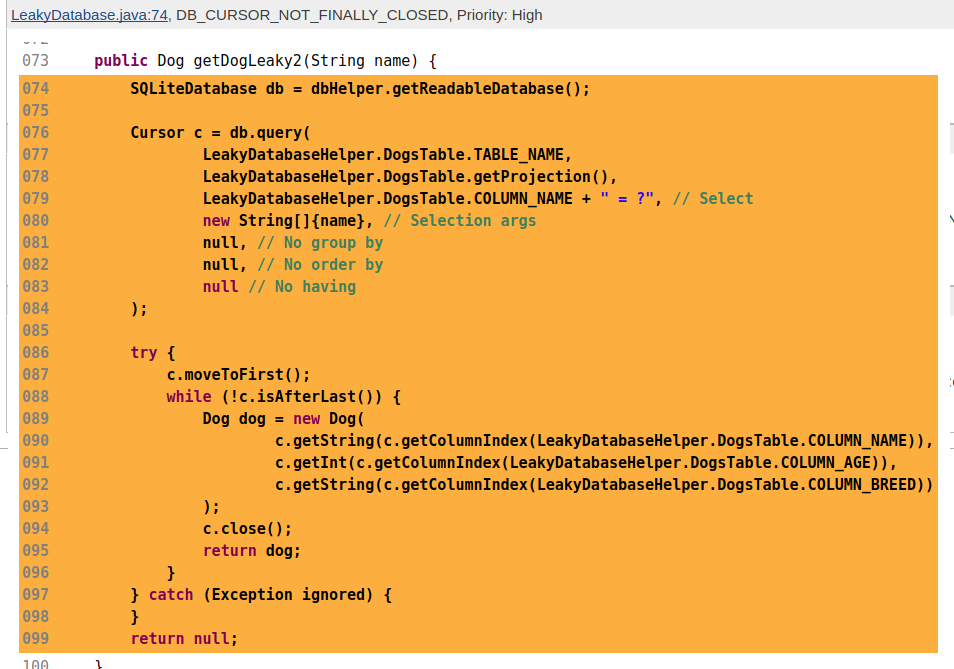
There is a workaround, however, which is to use an explicit finally block to
close your cursors:
Cursor c = db.query(...);try{
c.moveToFirst();while(!c.isAfterLast()){returnnew Foo(
c.getString(c.getColumnIndex(...))...);}}finally{
c.close();}
This achieves the same result, albeit with slightly more lines. But good
enough. Now the issue we want to address is that every now and then, someone is
going to forget to wrap their cursor operations, and leak one. javac won’t
catch it, android lint will only catch it sometimes, and neither really care
about using try-with-resources. So let’s implement our own detector for
findbugs that does! As acceptance criteria, let’s say that our detector needs
to be able to
Detect cursor operations (other than Cursor#close) that are called outside
of a try {} block
Detect try/catch blocks in methods that open cursors that do not close the
cursor as part of their cleanup routine.
Detective work
First things first, we need to create a new detector. In order to make it
easier to bundle my detectors with my app, I’ve added them to a module in the
same project tree as can be seen
here.
The key ingredients are three files:
findbugs.xml: Your main plugin definition. This declares your plugin’s
package, which classes within it are detectors, and which bugs they can be
expected to surface.
messages.xml: A collection of strings that describe your plugin, detectors
and each bug instance that you can raise.
A detector! This should be a class that extends either the
OpcodeStackDetector or BytecodeScanningDetector.
For this detector, we’ll extend the more basic BytecodeScanningDetector since
we don’t really need to fuss with the stack at all. Since at this point we
don’t really know that much about how we’ll actually write this detector, the
best first thing to do is take a look at how the bytecode for the cases we care
about is structured. So let’s code up a quick ‘detector’ that just prints out
the code for methods that involve cursors:
publicclassTestDetector BytecodeScanningDetector {privatestaticfinal String ANDROID_CURSOR ="Landroid/database/Cursor;";@OverridepublicvoidvisitMethod(Method method){super.visitMethod(method);// Fetch the table of local variables for this new method
LocalVariableTable localVariableTable = method.getLocalVariableTable();// If any of the local variables in this method are of the type Cursor,
// then let's print a dump of the method's bytecode.
if(variableTableContainsType(localVariableTable, ANDROID_CURSOR)){
System.out.println(method.getCode());}}/**
* Simple method that iterates over a variable table and returns whether or
* not any of the entries have the specified type signature.
* @param table Local variable table
* @param type Java class type we're searching for
* @return True if any of the local variables are of class type
*/privatestaticbooleanvariableTableContainsType(LocalVariableTable table, String type){for(LocalVariable variable : table.getLocalVariableTable()){if(type.equals(variable.getSignature())){returntrue;}}returnfalse;}}
And in order to get a more readable output, let’s create a dummy test method
that assumes it has and then closes a cursor, with some string literals to help
us pinpoint operations:
publicvoidtryFinallyExample(){
Cursor c =null;
System.out.println("Before");try{
System.out.println("Try");}finally{
System.out.println("Finally");
c.close();}
System.out.println("After");}
Now let’s assemble both our project and our ‘detector’ and then run the
detector (outside of gradle, since gradle will swallow our System.out
debugging lines)
Looking at the code dump, we learn something interesting about how the try ...
finally block has been implemented at the bytecode level. The body of our
finally appears in two places - once at the end of the contents of the try
block at opcode 18, and once at opcode 36. So rather than having a single
finally label and jumping to it both when an exception is thrown and when one
isn’t, the two paths exist separately. If the try block exists normally, then
control flows through the finally copy in codes 18-32, after which it jumps to
the ‘After’ code we added at code 52 and exits.
If, however, an exception is thrown, then the source is checked againts the
exception table for the method. We have one entry, for any exception type, that
covers codes 10-18 and has a handler located at code 58. Codes 10-18 (not
inclusive) are our try block, so this adds up. Code 35 is just after the jump
to ‘After’ that would have ended the method in the no-exception case, and is
the start of our exception handling routine.
In this routine, we can see that the first thing we do is astore_2: take the
topmost value from the operand stack and store in local variable 2. If we look
at the StackMap dump at the end, we can see that there’s an entry for this
section - one stack item, of type Throwable. So far, so good. We then call the
same finally block code that was called in the other branch, but afterwards
we then perform the re-throwing of the exception by loading it back onto the
stack (aload_2, code 50) and throwing it (athrow, 51)
Bytecode wrangling
OK, now that we have an idea of what our try structure looks like as bytecode
and the data we have available to us at detector runtime, let’s take a look at
how we can meet the criteria we set out earlier.
First, let’s tackle the easier case where a cursor method is called while we’re
outside of a try block.
So firstly, we want to be able to know if a given instruction is a method call.
Conveniently, our BytecodeScanningDetector extends the DismantleBytecode
class, which at each opcode decodes the instruction as well as any arguments
and makes them readily accessible. This means that in order to check if we’re
at a method call on a cursor, we need only do the following for each opcode we
see:
privatestaticfinal String ANDROID_CURSOR_CLASS_CONST_OPERAND ="android/database/Cursor";privatevoidcheckIfCursorMethodsCalledOutsideTry(int seen){// Not a method call, return
if(!isMethodCall()){return;}// If the method is not being called on a cursor, return
if(!ANDROID_CURSOR_CLASS_CONST_OPERAND.equals(getClassConstantOperand())){return;}// Figure out try block later
}
Now that we can know if we’re at a call to an instance method of a cursor, we
need to be able to check if the call is happening inside of a try. Luckily, we
can use the info encoded in the ‘Exception handlers’ section of the code dump
above to help us out. We can see that we have one handler registered, which
covers codes 10-18 and has a handler method at code 35. Since it looks like
bytecode indexes 10-18 are the body of the try block, we can easily use the
offsets from the exception table to find out if a given program counter index
is inside a try block or not! So let’s translate that logic to code:
privatestaticbooleanisInTryBlock(Method method,int pc){
CodeException[] exceptionTable = method.getCode().getExceptionTable();for(CodeException exception : exceptionTable){if(exception.getStartPC()<= pc && pc < exception.getEndPC()){returntrue;}}returnfalse;}
and update our detector method from before:
privatestaticfinal String ANDROID_CURSOR_CLASS_CONST_OPERAND ="android/database/Cursor";privatestaticfinal String CLOSE ="close";privatevoidcheckIfCursorMethodsCalledOutsideTry(int seen){// Not a method call, return
if(!isMethodCall()){return;}// If the method is not being called on a cursor, return
if(!ANDROID_CURSOR_CLASS_CONST_OPERAND.equals(getClassConstantOperand())){return;}// If a method is called on a cursor outside a try block, and that method is not
// close, that's an error!
if(!CLOSE.equals(getNameConstantOperand())&&!isInTryBlock(getMethod(), getPC())){
System.out.println("Cursor."+ getNameConstantOperand()+" called outside of try block!");}}
Excellent! Now all we need to do is pass the bug info up into findbugs so it
can be processed and displayed with other detector output. This can be done
with a quick snippet:
Word of warning: the detector is highly stateful! When sawOpcode is called,
all of the isMethodCall() / etc. checks, and the line numbers recorded by
the above accumulateBug call refer to the current opcode. If you,
e.g., have a bug case where you mark the start of a possible bug at one opcode
and confirm it at a later point, accumulating the bug at the second location
will report it as though that is where it occurred!
That detector wasn’t too bad at all. Let’s move on to our second goal -
detecting try {} blocks in methods with cursors that don’t close those
cursors. In order to check whether we are operating inside a finally block,
we’re going to use a similar trick for checking if we’re in a try block. This
time we can’t just use the provided numbers though, since the table only has
the entry point for the handler. That’s OK though, since we know that the
handler will have to end in either a goto, areturn or athrow.
/**
* Finally blocks are defined as the PCs between the handler PC and the next call to athrow,
* goto or return.
*
* @param method
* @param pc
* @return
*/privateintgetFinallyBlockIndex(Method method,int pc){
CodeException[] exceptionTable = method.getCode().getExceptionTable();int blockIndex = 0;for(CodeException exception : exceptionTable){if(exception.getHandlerPC()<= pc){int pc2 = pc;int codeByte;while((codeByte = getCodeByte(pc2))!= ATHROW && codeByte != ARETURN && codeByte != GOTO && pc2 < getMaxPC()){
pc2++;}if((codeByte == ATHROW || codeByte == ARETURN || codeByte == GOTO)&& pc < pc2){return blockIndex;}}
blockIndex++;}return-1;}
Not the best runtime complexity to be calling this all the time, but good
enough for now. This detection method is going to be a bit more stateful - for
each opcode, we’re going to check if we’re in a finally block, and if so:
Add an entry to our local log of the start of the block
Check if the current opcode in the block is a method call
If it is, check if it’s on a cursor
If so, check if it’s a close
If it is, mark this finally block as good
If it’s not, then this block might be leaky!
So let’s port that logic over:
privatefinal Map<String, FinallyInfo> suspectFinallys =new HashMap<>();privatestaticclassFinallyInfo{boolean callsCursorClose;
BugInstance bugInstance;publicFinallyInfo(BugInstance instance){this.callsCursorClose=false;this.bugInstance= instance;}}privatevoidcheckExceptionHandlersCloseCursors(int seen){// Check if we're in a finally block
int blockIndex = getFinallyBlockIndex(getMethod(), getPC());if(blockIndex < 0){return;}// We create a bug instance immediately on entering *all* finally blocks;
// this is just so that we get the line numbers in the right place.
// If the finally block does close the cursor, we just toss the buginstance
String finallyReference = getMethodName()+ blockIndex;if(!suspectFinallys.containsKey(finallyReference)){
suspectFinallys.put(finallyReference,new FinallyInfo(new BugInstance(this,"DB_CURSOR_NOT_FINALLY_CLOSED",
HIGH_PRIORITY
).addClassAndMethod(this)));}// Not a method call, return
if(!isMethodCall()){return;}// If the method is not being called on a cursor, return
if(!ANDROID_CURSOR_CLASS_CONST_OPERAND.equals(getClassConstantOperand())){return;}// If the method isn't close, return
if(!CLOSE.equals(getNameConstantOperand())){return;}// Mark this finally block as OK
suspectFinallys.get(finallyReference).callsCursorClose=true;}
And that’s pretty much it! There’s a little bit of extra accounting that is
necessary to actually finish up and report all the bugs accumulated in that
fashion, which can be found
here
for those curious. Now that we have these detectors set up, the next time we
run this project through our CI system (in this case Jenkins), we should see it
error out with our expected bug instances:
Perfect! No more unclosed cursors. From the basic ideas here, it should be
possible to add checks on more or less any code pattern that you want to make
sure to implement or avoid in your production code.
Sun, Feb 26, 2017Companion code for this post available on Github
TL;DR:
I built a tool to turn Android trace output in to flame graphs.
You can check out the source code
here,
or get started immediately by uploading a trace file
here
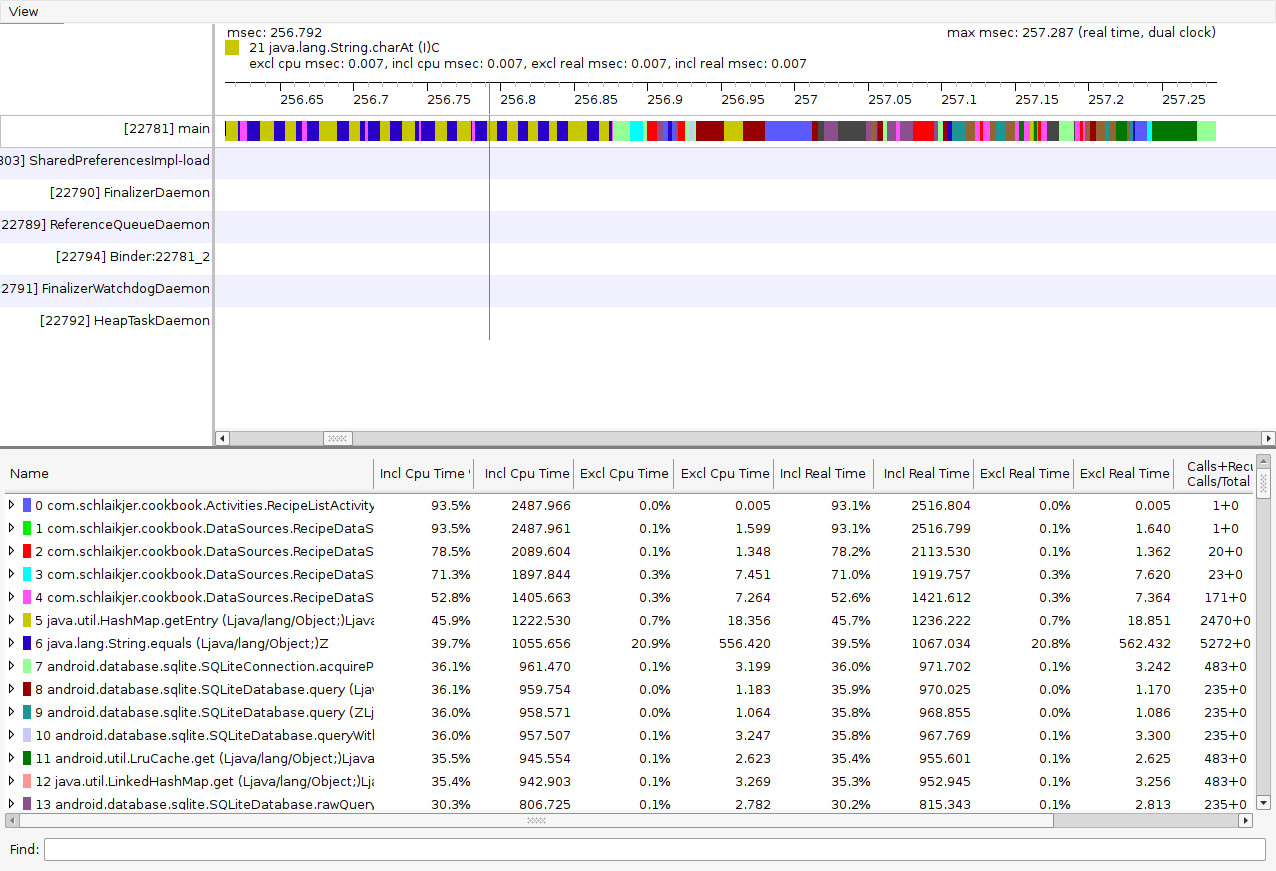
If you’ve ever tried to debug a performance issue in an Android app, you’ve
probably become familiar with Traceview, which reads the .trace files
generated by the
Debug.startMethodTracing
API call and displays them in a more or less readable manner.
However, for me at least, Traceview is less than ideal. The interface is rather
clunky, the scrolling behaviour is questionable (zooming and scrolling down at
the same time? Just what I wanted?) and it’s very difficult to interpret the
call chains that are consuming the most of your time, especially if multiple
threads are involved.
Traceview. Isn't obvious from the coloured bars what's going on?
One of the most useful performance visualization and analysis tools I am aware
of is
Brendan Gregg’s Flame Graphs,
which make it easy to identify long-running sections of your code. However, I
couldn’t find any existing tooling for converting the Android trace format to
flat stack format expected by the flamegraph generator, so it was time to get
familiar with the internals of the format.
First things first, we need to gather a trace. In my case, I have an app that
takes an appreciable amount of time to load the first Activity, so I’m going
to add trace sections to onCreate, onStart and onResume, following this
pattern:
privatestaticfinalint MEGABYTE = 1024 * 1024;@OverrideprotectedvoidonCreate(Bundle savedInstanceState){super.onCreate(savedInstanceState);// Call the resulting trace file 'onCreate.trace', and allow a 128MiB
// buffer for collecting trace data.
Debug.startMethodTracing("onCreate", 128 * MEGABYTE);// Existing onCreate code
[...]// Stop method tracing
Debug.stopMethodTracing();}
Once that’s added, we can start up the app normally and wait for it to finish
booting. Note that like all profiliers, this trace mechanism adds overhead!
Don’t make decisions based on the absolute timings as correct when dealing with
these traces, but rather the differences between traces. Your app will also
take noticeably longer to start while profiling is active - this is normal.
Once it has loaded, open up adb and take a look to check that your traces
have been created:
And then pull all of them up so that we can take a look at them:
ross@mjolnir:/h/ross$ for F in {Create,Start,Resume}; do adb pull /sdcard/Android/data/com.schlaikjer.cookbook/files/on$F.trace; done
4693 KB/s (57473027 bytes in 11.959s)
710 KB/s (60809 bytes in 0.083s)
79 KB/s (6255 bytes in 0.077s)
If we crack one open with our editor of choice, we can see that the files begin
with three plain text sections, followed by what looks like a lot of binary
data:
Some of these (elapsed time, number of calls, vm name &c) are pretty intuitive.
For the rest of them, the best way to figure out what they are is to look at
the code
that generates them!
os << StringPrintf("%cversion\n", kTraceTokenChar);
os << StringPrintf("%d\n", GetTraceVersion(clock_source_));
os << StringPrintf("data-file-overflow=%s\n", overflow_ ?"true":"false");
if (UseThreadCpuClock()) {
if (UseWallClock()) {
os << StringPrintf("clock=dual\n");
} else {
os << StringPrintf("clock=thread-cpu\n");
}
} else {
os << StringPrintf("clock=wall\n");
}
os << StringPrintf("elapsed-time-usec=%" PRIu64 "\n", elapsed);
if (trace_output_mode_ != TraceOutputMode::kStreaming) {
size_t num_records = (final_offset - kTraceHeaderLength) / GetRecordSize(clock_source_);
os << StringPrintf("num-method-calls=%zd\n", num_records);
}
os << StringPrintf("clock-call-overhead-nsec=%d\n", clock_overhead_ns_);
os << StringPrintf("vm=art\n");
os << StringPrintf("pid=%d\n", getpid());
if ((flags_ & kTraceCountAllocs) !=0) {
os << StringPrintf("alloc-count=%d\n", Runtime::Current()->GetStat(KIND_ALLOCATED_OBJECTS));
os << StringPrintf("alloc-size=%d\n", Runtime::Current()->GetStat(KIND_ALLOCATED_BYTES));
os << StringPrintf("gc-count=%d\n", Runtime::Current()->GetStat(KIND_GC_INVOCATIONS));
}
Based on this, it looks like our version header consists of:
Version: The trace format version (3 for all devices I tested)
Data file overflow: The overflow_ flag seems to be set when if the amount
of calls in the binary trace section overflows the buffer specified in the
start trace call. If you see this set to true, you should re-run your trace
with a larger buffer to ensure you aren’t missing any information.
Clock: Whether the trace data uses wallclock time, per-thread CPU time, or
both. All tested devices reported both clock times.
Elapsed clock: The total trace time, in microseconds.
Clock call overhead: The amount of time it takes to check the time. Any
measurements close to or below this number should be assumed to be below the
noise floor for this trace.
VM: Art or Dalvik
Pid: The process ID of the process under trace
There are also three fields that were not present in the trace we took a look
at:
Alloc count: Number of allocated objects
Alloc size: Size of all allocated objects
GC count: The number of collections that have occurred
With that under our belt, let’s move on to the Threads section. This one is
pretty simple:
So each entry under the thread section is just a tuple of Thread ID and a human
readable thread name. The
method section
is similar, but has a few more fields:
Method declaration line number (only present for some runtimes)
That’s all the text sections dealt with. Now we can take a look at the binary
data at the end of the file. Luckily, this section is actually described at the
top of
trace.h:
// File format:
//     header
//     record 0
//     record 1
//     ...
//
// Header format:
//     u4  magic ('SLOW')
//     u2  version
//     u2  offset to data
//     u8  start date/time in usec
//     u2  record size in bytes (version >= 2 only)
//     ... padding to 32 bytes
//
[...]
//
// Record format v3:
//     u2  thread ID
//     u4  method ID | method action
//     u4  time delta since start, in usec
//     u4  wall time since start, in usec (when clock == "dual" only)
//
// 32 bits of microseconds is 70 minutes.
//
// All values are stored in little-endian order.
The interesting thing to note here (and something that tripped me up for a
while) is the method ID | method action section of the record format. If we
take a look over in trace.cc, we can see how that’s implemented:
So with this data, we know that the method ID encoded in one of the trace
records with the lower two bits masked off will match one of the method IDs in
the *methods section of the plain text header. We can then use the lower two
bits to work out whether each entry is a method entry or exit (via either
return or stack unwind).
Armed with this, lets start writing a parser for these files. I chose Erlang
for a learning exercise, and also because I intended to make use of it’s
excellent binary matching
syntax in conjunction with binary comprehensions. Since we know the magic for
the binary section of the trace file (SLOW), let’s take a look at how we can
easily parse out the header and the records using binary matching.
-define(TRACE_HEADER_MAGIC, "SLOW").
% Find the location of the trace header
{HeaderPos, _} =binary:match(Data, <<?TRACE_HEADER_MAGIC>>),
% Match out the entire header specification into variables
<<?TRACE_HEADER_MAGIC, VersionBin:2/binary, DataOffsetBin:2/binary,
StartTimeBin:8/binary, RecordSizeBin:2/binary>>=binary:part(Data, {HeaderPos, 18}),
% Remember all numbers are little endian
DataOffset=binary:decode_unsigned(DataOffsetBin, little),
RecordSize=binary:decode_unsigned(RecordSizeBin, little),
% Now that we have the header start and header size, we can start parsing out
% the call records themselves. First, excerpt the section of the trace that
% contains the binary data
SectionStart=HeaderPos+DataOffset,
SectionEnd=byte_size(Data),
RecordSection=binary_part(Data, {SectionStart, SectionEnd - SectionStart}),
% Now that we have the records, we can break them up based on the RecordSize
% that the header speficied and parse them
Records= [Record || <<Record:RecordSize/binary>><=RecordSection],
ParsedRecords= [parse_trace_record(Record) || Record<- Records].
As you can see, extracting the records section and parsing the header was pretty
simple using the binary syntax. We use the same approach to parse out the
records themselves:
parse_trace_record(Record) ->
<<ThreadId:2/binary, MethodIdActionBin:4/binary,
TimeDelta:4/binary, WallTimeDelta:4/binary>>=Record,
% Decode the method ID and action from a binary to an integer
MethodIdAction=binary:decode_unsigned(MethodIdActionBin, little),
% Now remember that this is a 4-byte integer, and that the top bits
% are the actual method ID
MethodId=MethodIdActionband16#FFFFFFFC,
% While the action is the lower two bits.
% Convert to an atom for readability
MethodAction=caseMethodIdActionband16#00000003of16#00 -> enter;
16#01 -> exit;
16#02 -> unwindend,
#call_record{
thread_id=binary:decode_unsigned(ThreadId, little),
method_id=MethodId,
method_action=MethodAction,
time_delta=binary:decode_unsigned(TimeDelta, little),
wall_time_delta=binary:decode_unsigned(WallTimeDelta, little),
child_time=0
}.
That’s most of the hard work! The full parser code, including the sections for
the thread and method tables, can be seen in the final parser implementation
here.
Now that we have our call records, method IDs and thread IDs, we need to
actually convert that data into the format that the flame graph generator can
handle. It expects to receive data as ; delimited stack frames, followed by a
space and a number representing the time / samples / cycles spent in the final
call in that stack. To calculate this, we iterate over all these records
per-thread and perform the following:
For a method entry: Push the method name onto a stack, so that we can keep
track of what methods have been called. Also push the full method record onto a
second stack, so that we can reference its timings later.
For a method exit/unwind: Here’s where the real logic happens. When a method exits,
the stack should contain the matching method entry record. We can use the time
on the two records to calculate how much time was spent in this method call
altogether. If there is another parent on the stack, we update it to reflect
how much time was spent in the current call - this allows for separate tracking
of self and child call times. We then take the self time (subtracting any
children from the current call), and update a map of method name list -> time
with the self time. This deduplicates identical call chains.
Once we have iterated over all the calls, we should have a map of lists of
method names to timings. From there, we can just join the names with
semicolons, append a space and the timing, and it’s all set to be processed by
flamegraph.pl.
The code implementing this logic can be found
here.
Once we have the trace data, we can process the graph:
In order to make this process a lot simpler and less manual, the trace parsing
and graph generation have all been rolled into a simple server than you can
run. Instructions are available on
Github,
and there is also a public copy of the server running at
https://aflame.rhye.org/
if you want to try out uploading your own traces.
The full per-thread breakdown for the example onCreate trace we generated can
be found online
here.